How to Test for Mould Using the SAN-AIR Mould & Bacteria Test Kit
, by Tatianna Gerard, 12 min reading time
, by Tatianna Gerard, 12 min reading time
Mould is one of those things that lurks quietly in the background—until it becomes a problem you can’t ignore. You might notice a musty odour, a patch of discolouration creeping up your walls, or, worse, unexplained allergies and respiratory issues in your household. But here’s the tricky part: mould doesn’t always make itself obvious. It can thrive behind walls, beneath carpets, inside air conditioning units, and even in the air you breathe. By the time you see visible signs, it may have already spread significantly.
Mould and bacteria flourish in damp, humid environments, making certain conditions particularly ideal for their growth. Weather plays a big role. In warm and humid climates, mould spreads rapidly, feeding on moisture in the air. But it isn’t just summer humidity that invites trouble—winter condensation can also create perfect breeding grounds, especially in homes with poor ventilation.
Mould exposure can lead to a range of health issues, from mild allergic reactions like sneezing and itchy eyes to more severe problems like asthma flare-ups, chronic respiratory conditions, and even skin irritation. Certain types of mould, such as black mould (Stachybotrys chartarum), can release mycotoxins that are particularly harmful to those with weakened immune systems, children, and pets.
So, how do you know if mould or bacteria is quietly taking hold in your home? That’s where testing comes in. Instead of waiting for a problem to become visible—or worse, impact your health—proactive testing can help you detect hidden mould early and take action before it spreads.
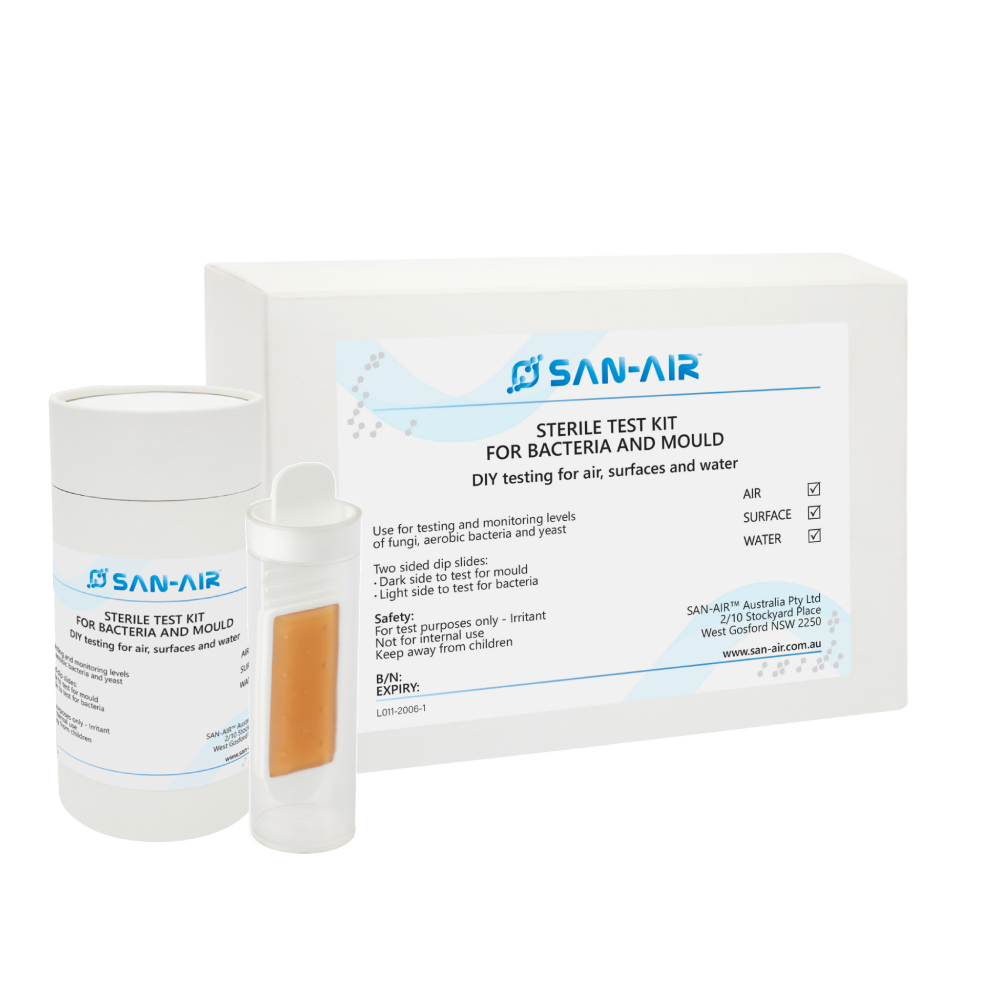
The SAN-AIR Mould & Bacteria Test Kit offers a simple and reliable way to check for mould contamination in your living space, whether you’re concerned about a specific area or just want peace of mind. This easy-to-use kit helps you identify potential risks before they become major issues, allowing you to take control of your indoor air quality.
But how does it actually work?
The mould testing kit uses a convenient and effective method for detecting mould spores and bacteria in the air, water or on surfaces.The mould test kit is simple to use, allowing you to sample air quality or surface contamination with ease. After exposure to the environment being tested, the slides are incubated for a specific period, during which microbial growth becomes visible. This provides an early warning system for potential mould or bacterial contamination, enabling you to take preventative action before the issue escalates.
This kit is suitable for testing a variety of indoor environments, including:
Now, let’s walk through how to use the SAN-AIR Mould & Bacteria Test Kit step by step.
Using the SAN-AIR Mould & Bacteria Test Kit is a straightforward process that allows you to detect the presence of mould and bacteria in your indoor environment. Whether you're testing the air, a surface, or water, following these steps carefully will ensure accurate results.
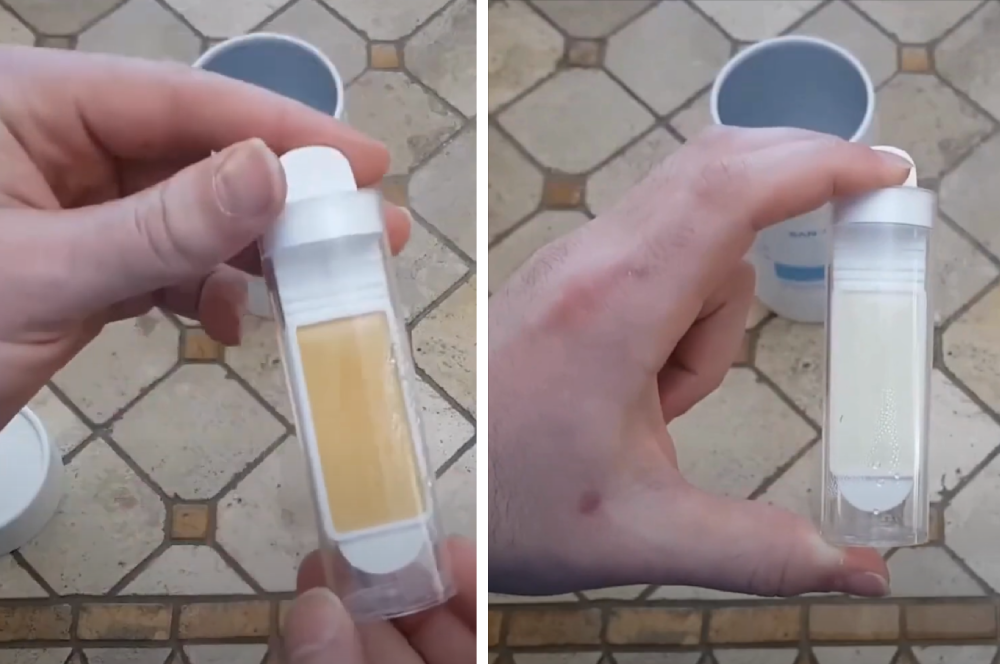
Before you begin, it’s important to know how the dip slide works:
Depending on where you suspect mould or bacteria might be present, you can test air, surfaces, or water using the following methods:
A) Air Sample Testing (For testing airborne mould spores and bacteria)
📌 This method helps assess whether airborne mould spores or bacteria are circulating in your environment.
B) Surface Sample Testing (For detecting contamination on furniture, walls, air conditioning vents, etc.)

📌 Ideal for checking commonly affected areas like bathroom tiles, kitchen counters, air vents, and fabrics.
C) Water Sample Testing (For testing drinking water, humidifiers, tanks, and reservoirs)

📌 Useful for assessing water sources for bacterial and fungal contamination, especially in stagnant or stored water.
Examples to write on the label:
OR
OR
OR
The test sample needs time to develop results, which can be done in two ways:
1. Incubation at home
Store the dip slide in a warm location (25°C to 32°C) inside a sealed box for 48 to 120 hours.
📌 Higher temperatures may speed up bacterial and mould growth, while lower temperatures may extend the incubation period.
2. Sending the sample to a laboratory
If you prefer professional analysis, you can send your test kit to a laboratory for incubation and detailed assessment. Labs we suggest contacting in Australia:
✔ Mycolab/Mycotec
✔ Eurofins
However, please note:
📌 Before sending your sample, we recommend reaching out to the lab for specific instructions on packaging and submission requirements.
Test result interpretation:
| Level of Infestation | Light | Medium | Heavy |
| Mould |
|
|
|
| Bacteria/mould |
|
|
|
| Status |
Normal levels of bacteria and mould typically present in most buildings Note: It is extremely uncommon to find an indoor environment that does not have any mould.
|
Infestation is likely to increase significantly if left untreated. Affected area would require cleaning within a week.
|
Infestation is severe and dangerous for health. Room should be sealed and should not be occupied. If entering room, wear protective gear (masks, goggles, coveralls, gloves and shoe covers). |
Once the testing process is complete, it is important to dispose of the dip slide correctly to prevent further contamination:
✔ Method 1:
✔ Method 2:
If your test results indicate low to moderate contamination, consider using SAN-AIR Mould Removal and Air Purifying products to help control and prevent mould and bacterial growth.
If the contamination is severe, professional mould remediation may be necessary to address hidden or widespread issues.
Not sure whether you can handle the issue yourself or if you need expert help? Get expert insights by downloading our FREE eBook on mould remediation → When to DIY and When to Call a Pro: A Homeowner’s Guide to Mould Remediation.
👉 Download our FREE eBook now!